
Performance Footwear Design: Balancing Function and Aesthetics Guide
Balance cushioning, traction, and aesthetics in performance footwear while understanding material constraints and zoned construction.

Performance footwear designers sketch midsole profiles and spec materials based on biomechanical requirements, but they usually can't evaluate whether the proportions work until they see those designs rendered. Does a 28mm heel stack look bulky or performance-oriented? Does that sidewall taper read as lightweight construction or cheap? Will that carbon plate geometry create an aggressive visual line or look clunky?
Physical samples used to be the only way to answer these questions, which meant committing to a direction just to see if your design actually works. But what if you could clearly visualize your design before ever creating a physical prototype?
Read on to learn how you can save money on physical prototypes with 3D rendering tools like Render.
You can compare a dozen midsole variations as photorealistic outputs before building a single prototype, then make material and proportion decisions based on what you actually see rather than what you imagine might work.
The Physics That Won't Budge
Material science sets hard limits on what's possible with performance footwear. These are physical constraints rooted in how polymers and rubber compounds behave under stress.
Foam Density Tensions
Higher-density formulations provide stability and last longer, but feel harsh underfoot. Softer foams cushion beautifully but compress permanently after repeated use and offer less support during lateral movements.
You can't have the softest cushioning and highest stability from the same material.
Rubber Weight Considerations
Dense carbon rubber provides longer wear life and better traction, but adds significant weight. Blown rubber offers a lighter, softer alternative that enhances cushioning at the expense of wear resistance.
You're constantly choosing which property matters most for specific movement patterns.
Strategic Zoning
When no single material works for everything, zoned construction becomes essential.
- Harder rubber in heel strike areas for durability
- Softer, tackier compounds in forefoot pivot zones for grip
- Denser foam in the midfoot for stability
- Softer foam in the forefoot for cushioning
This spatial differentiation lets you manage constraints across different regions of the shoe rather than accepting a single compromise everywhere.
How Midsole Materials Affect Performance
Manufacturer energy return claims overestimate foam performance by about 57% on average. You need validated testing protocols, not marketing spec sheets.
Primary Midsole Materials
The three primary midsole materials each have distinct performance profiles:
Material
Pros
Cons
Best For
EVA (ethylene vinyl acetate)
Economical, light, easy to process, and predictable degradation
Degrades over time with continuous impact
Budget performance
TPU (thermoplastic polyurethane)
Durable, resilient, better wear resistance
Heavier, reduces running economy vs EVA
Durability priority
PEBA (polyether block amide)
Lightest weight, highest energy return, excellent with supercritical foaming
Expensive, limited long-term durability data
Elite performance
EVA tends to improve running economy compared to TPU in submaximal conditions, but TPU's durability comes at the cost of efficiency.
Supercritical Foaming
Supercritical foaming has changed what's possible with all three base polymers. The process creates stable microcell structures that make foams lighter and bouncier.
When PEBA undergoes supercritical foaming, it becomes lighter, more responsive, and more resistant to low temperatures. Advanced compounds enabled by this technology deliver running economy improvements.
Even with supercritical processing, TPU and EVA can't match PEBA in rebound, weight, and durability characteristics. The base polymer still matters.
Testing Beyond Marketing Claims
Physical testing validates whether materials deliver intended performance. Run impact cycling tests, collect durability data, and measure actual compression rates under load.
ASTM F1614 protocols tell you more than manufacturer percentages. Those measurements use testing conditions that don't reflect real-world use.
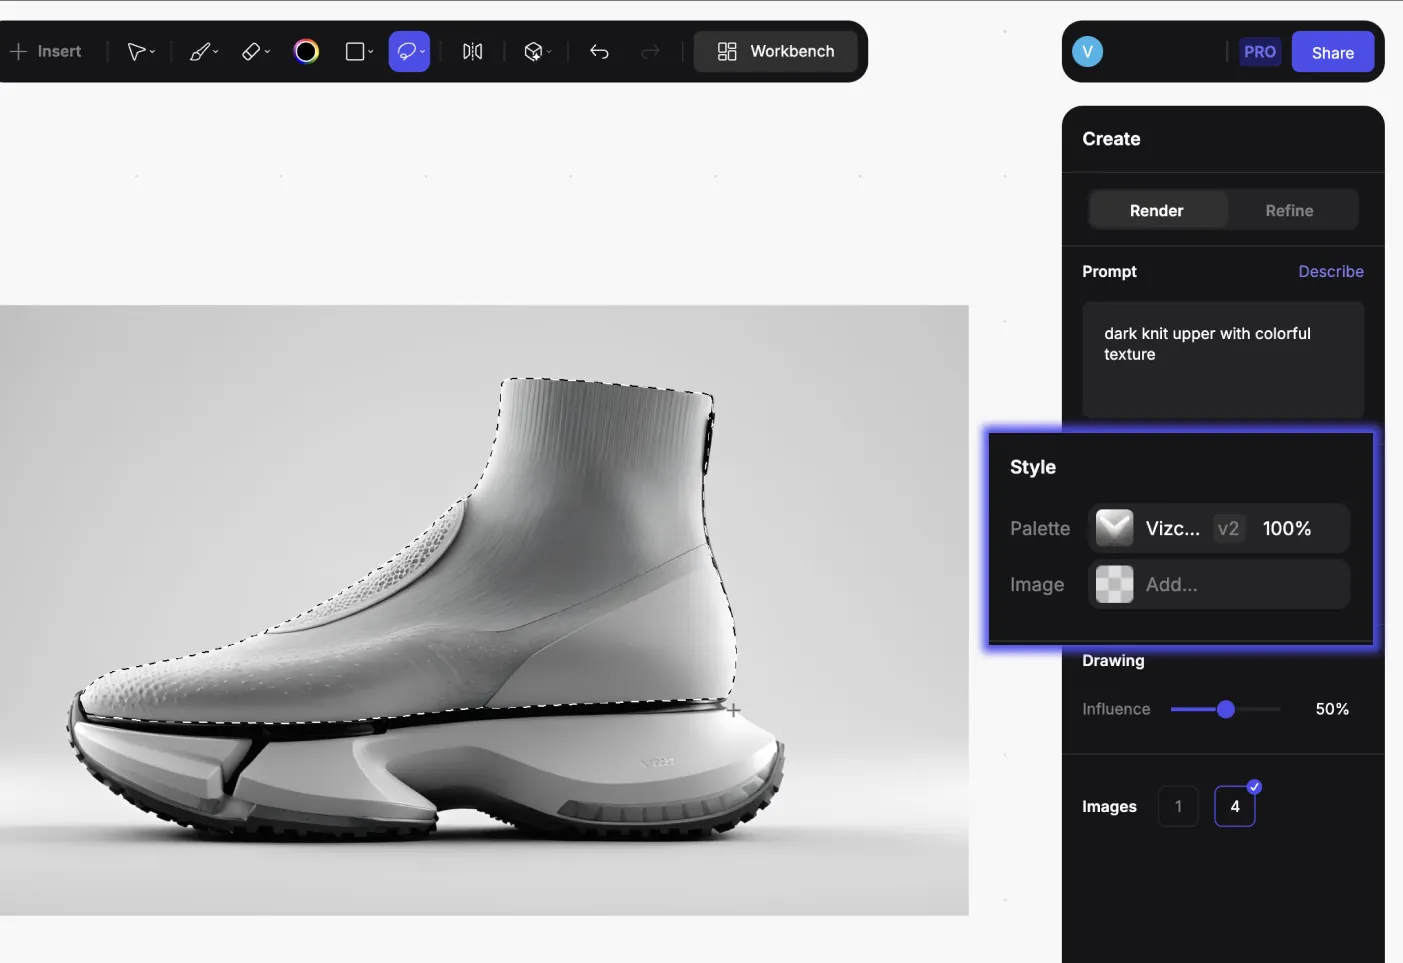
When you're sketching midsole geometries, understanding which foam you're designing for affects everything from sidewall thickness to how visible you want the foam structure to be.
The Render feature turns your midsole sketches into photorealistic output in seconds. Evaluate how different foam visibility options, exposed cell structure versus smooth sidewalls, communicate cushioning intent before cutting physical samples.
How To Design Traction Systems
Outsole design balances factors that directly conflict: grip, weight, flexibility, slip resistance, and durability.
Rubber Compound Selection
Carbon rubber forms the backbone of most performance outsoles. Place it strategically on high-wear areas to maximize both traction and longevity.
Blown rubber provides a lighter, softer alternative that enhances cushioning but sacrifices wear resistance. Compounds reinforced with carbon black or silica improve slip resistance through molecular-level improvements.
Lug Pattern Geometry
The grip pattern you design interacts with rubber compound in ways that aren't always intuitive. A pattern that works brilliantly in low-durometer compounds might provide inadequate bite in harder rubber.
Surface texture, lug height, spacing, and orientation all affect ground engagement. For indoor court surfaces, shorter cleats (as minimal as 2.6mm) combined with specific rubber formulations achieve better traction without excessive grip that could cause injury.
Zoned Outsole Construction
The practical approach mirrors the midsole strategy. Place harder, more durable rubber where the shoe contacts the ground most frequently in the heel strike zones and high-wear forefoot areas. Softer, tackier compounds go in pivot zones where grip matters more than longevity.
When you're exploring lug pattern variations, Render lets you see how different textures and depths read against various surfaces. Evaluate whether complex geometric patterns create visual noise or reinforce performance character before finalizing tooling.
What Most Sports Require
Running shoes, basketball shoes, and training shoes address biomechanical demands that are fundamentally distinct.
Running
Running creates predominantly vertical impact forces during heel strike with repetitive forward motion. Your cushioning system manages vertical shock absorption without introducing so much softness that proprioception disappears.
The heel-toe drop you choose influences foot strike patterns and alters force distribution across joints. Higher heels lead to different frontal plane ankle torques.
Basketball
Multi-directional forces from lateral cuts, jumping, landing, and rapid acceleration create loads that would destroy a running shoe's cushioning system.
Requirements shift toward:
- Multi-directional traction without dangerous catch points
- Ankle support that controls motion without restricting mobility
- Cushioning that protects during landing without feeling unstable during cuts
Lateral upper support placement influences coronal plane ankle mechanics independently of ground reaction forces, the support location affecting joint stability even when force magnitudes stay constant.
Training
Training shoes occupy a hybrid space with combined demands from running, jumping, lateral movements, and loaded exercises.
They require moderate cushioning that preserves lateral stability, unlike running shoes that maximize vertical shock absorption. The heel platform stays flatter for weightlifting stability while providing enough forefoot cushioning for cardio.
Zoned construction manages this through harder materials in midfoot stability zones and softer foam in forefoot cushioning zones.
Working Within Time Constraints in Performance Footwear
Footwear design timelines rarely allow for extensive iteration. When a high percentage of sketches move directly to production, early decisions carry more weight. The approach shifts in two ways: front-loading material expertise so decisions are informed from the start, and using visual exploration tools to evaluate more options before committing to physical samples.
Front-Loading Expertise
The workflow shifts toward informed selection rather than broad experimentation. Work from material specifications, prior testing data, and understanding of how different compounds perform.
Understanding the constraints, knowing which combinations work, and making confident decisions early all matter more when you can't iterate extensively.
Faster Visual Exploration
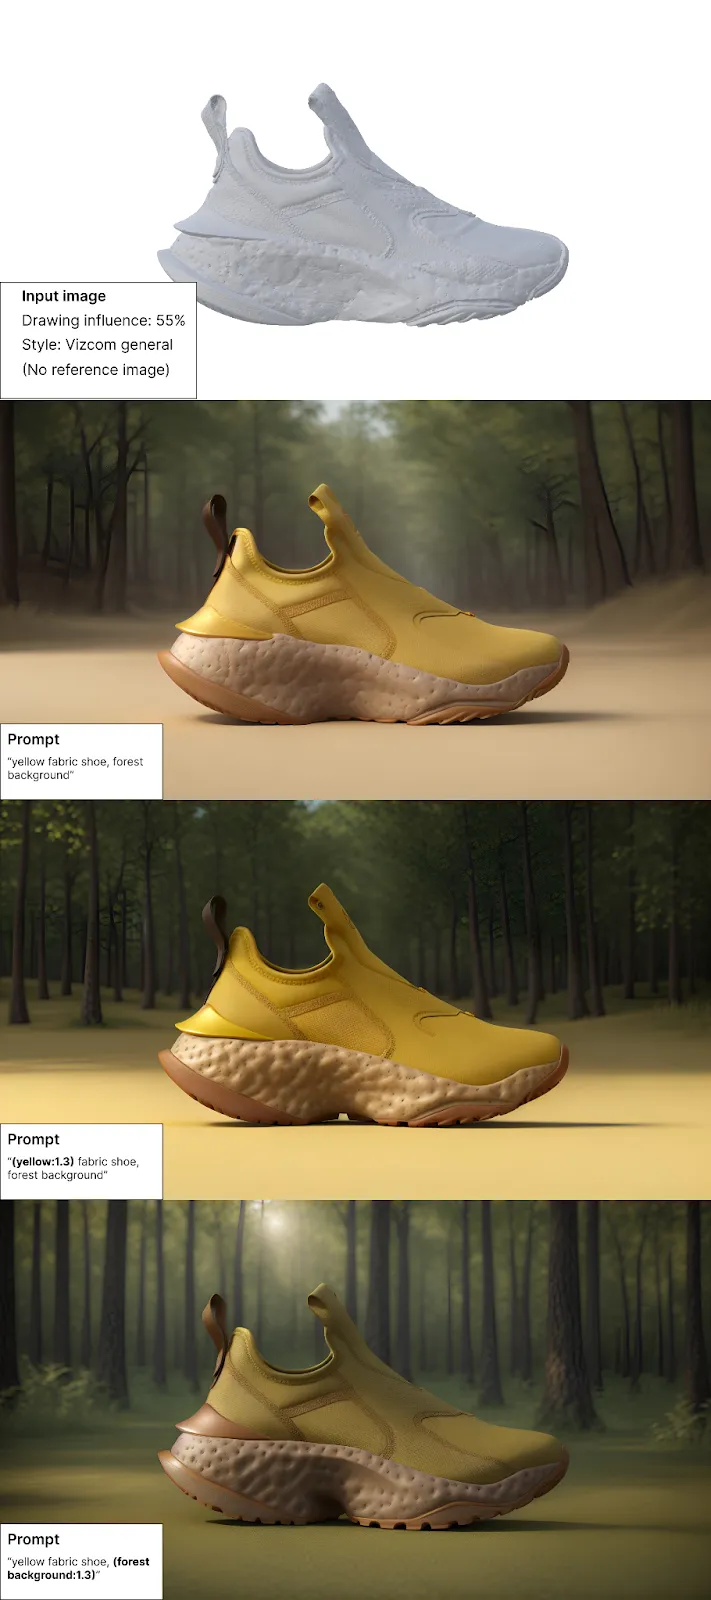
Custom Palettes lock in your brand's material language. When you're exploring fifty midsole variations, every render maintains the same leather tones and textile textures rather than random AI interpretations.
Color Match maintains Pantone accuracy from sketch to render. For footwear brands where colorway consistency across product lines is non-negotiable, this prevents the drift that happens when AI interprets "university red" differently in each generation.
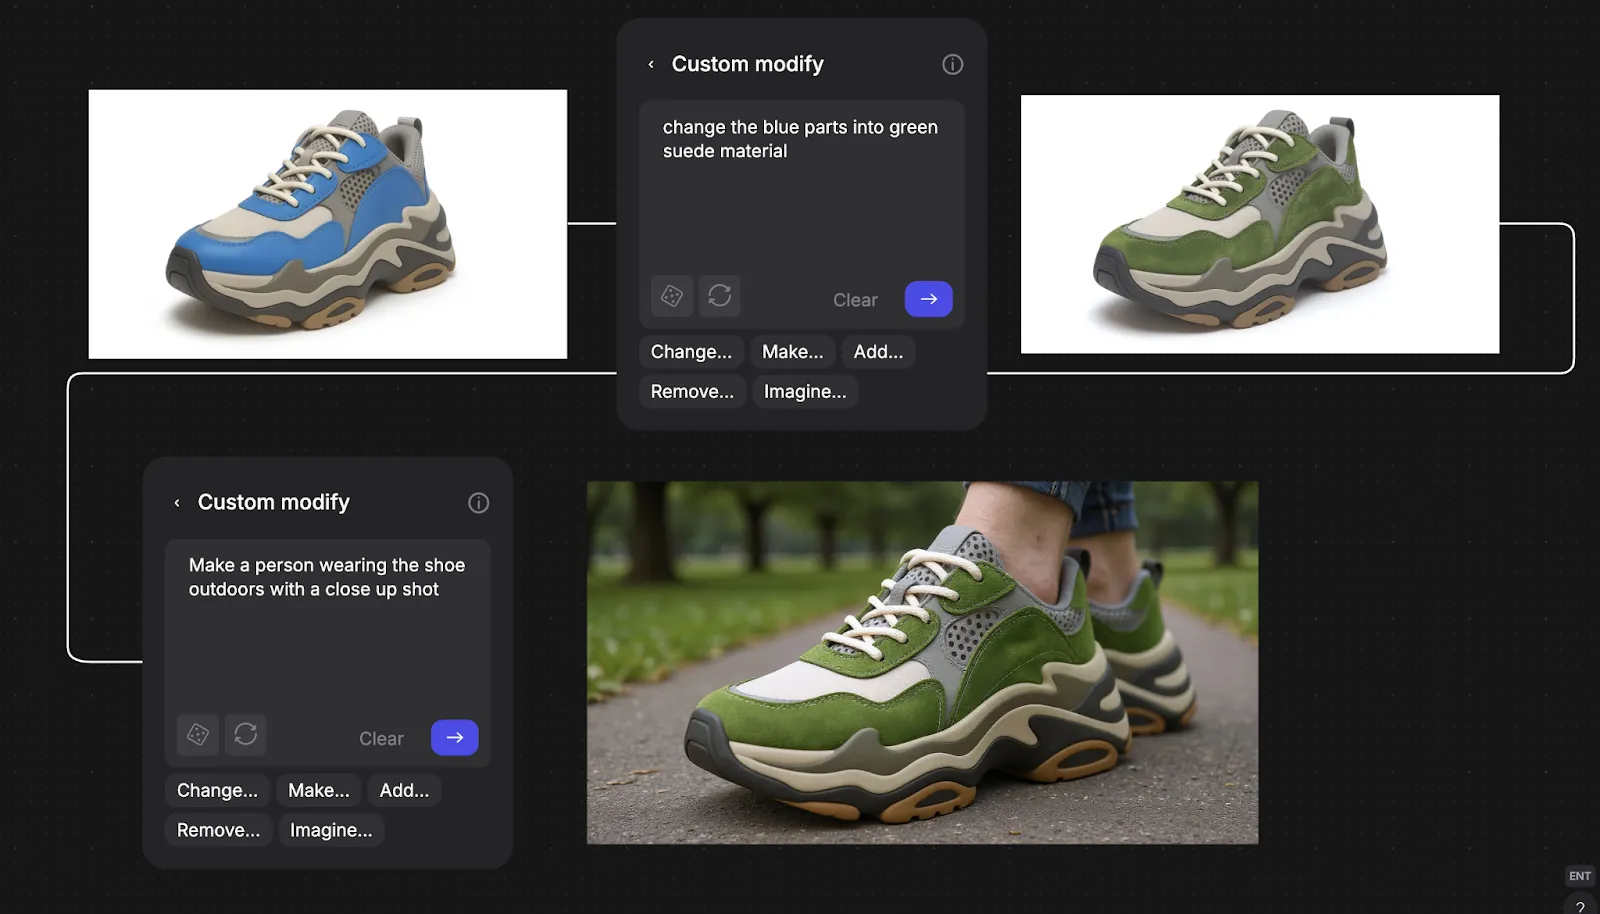
Make 3D generates textured meshes from your 2D renderings. Rotate to evaluate how lug patterns and sidewall geometry read from multiple angles before committing to tooling.
You're compressing the decision timeline without sacrificing quality.
Turning Trade-Offs Into Design Decisions
Zoned construction lets you balance different shoe regions for different priorities. Material selection informed by ASTM testing rather than marketing claims ensures you're working from accurate performance data. Sport-specific biomechanics understanding means you're prioritizing the right characteristics for actual movement patterns.
The physics don't change. But when you can explore fifty midsole profile variations in the time traditional workflows produce five, you find the edges where constraints become strategic advantages rather than compromises.
Navigating cushioning, traction, and aesthetics trade-offs is faster when you can see variations before cutting samples.
Book a demo to see how footwear teams like On, New Balance, and Brooks use Vizcom to explore material combinations and zoned construction strategies without deadline pressure forcing premature decisions.
Explore
Explore more blog posts & resources to get inspired

For one day during 3DaysofDesign in Copenhagen, Darcy's Cafe ran on a different currency — a sketch. Draw it, we'd render it live in Vizcom, and you'd walk out with a print — coffee included.

See how Kohler's industrial design team uses Vizcom to save time, speed up workflows, and create better work.
Explore the designs of Vizcom's San Francisco Design Week exhibition where furniture, footwear, lighting, and automotive concepts come to life through AI-powered visualization. Follow along as designers share the stories, sketches, and tools behind every piece on display.

Frequently asked questions
Yes of course! Our starter plan is completely free, no credit card required. This is a great plan to explore vizcom with.
We accept all major credit and debit cards.
Admins (paid) – can edit files, manage workspace settings, billing, teams, and invite members. Editors (paid) – can edit files but not manage settings, billing, or teams. Viewers (free) – can only view files in read-only mode.
Team billing is handled centrally by the Admin. All paid seats, whether Admins or Editors, are included in a single invoice under the same billing cycle, while Viewers remain free and do not affect the cost.
Yes, you can. An Admin can update the plan in the billing settings, and the switch will take effect on the next billing cycle at the annual rate.
Yes, you own everything you create in Vizcom. For free users, while Vizcom may use generated images to improve its services, it does not claim ownership of your designs, concepts, or original ideas—you keep full rights to them. For paid users, your images and designs remain entirely private and are only used to deliver the service. Every design, concept, and image you create or upload is fully yours and kept confidential.
Vizcom does not use your data to train AI models if you’re on a paid plan. Everything you create stays private and is only used to provide the service. Free users may have their generated images included to help improve Vizcom’s services, but even then, Vizcom does not claim ownership of your designs, concepts, or original ideas—you retain full rights.