
How to Turn a Drawing into a 3D Model: 3 Practical Paths for Designers
Turn sketches into 3D models using manual CAD, AI tools, or hybrid workflows. Learn which method works for your project and manufacturing needs.

Your manufacturing requirements can determine which path gets your sketch into 3D fastest. Production-ready parts with tight tolerances demand manual parametric CAD. Early exploration moves faster through AI sketch-to-3D tools. Most professional projects use both.
Read on to learn more about each method and when to use it.
Method 1: Manual CAD for Production-Ready Parts
Manual CAD gives you complete control over dimensions, surfaces, and manufacturing constraints. This path takes longer than AI generation, but it produces parametric models that manufacturers can actually use.
The geometry you build contains design intent, assembly constraints, and feature-based modeling data that survives translation to CNC machining, injection molding, and engineering analysis.
When to use: Manual CAD is the only path for production-ready parts. Use it when you need tight tolerances, manufacturing constraints, or geometry that engineers can modify. The trade-off is time. Learning CAD takes 6-12 months for basic competency and 1-2 years for mastery of complex surfacing.
Step 1: Set Up Your Reference Images
Start by scanning your sketch and bringing it into your CAD software as a reference image. Line up these images in the standard orthographic views (Top, Front, Right) and scale everything to match real-world dimensions. Proper alignment here saves hours of rework later.
Step 2: Build the Curve Network
With reference images aligned, build the curve network that defines your form. You're using Bezier curves or NURBS (Non-Uniform Rational B-Splines) to capture contours from your sketch.
Curve continuity determines whether your model looks professional or amateurish. The curves need to flow smoothly into each other, affecting how light moves across the finished product and whether manufacturing tooling will work correctly. Product design typically needs G2 continuity (smooth curvature flow), while automotive Class-A surfaces require G3 continuity (curvature rate of change consistency).
Step 3: Create 3D Surfaces
Once you've built your curve network, use it to create 3D surfaces.
- Loft lets you define profiles at different points, essential for modeling bottles, handles, or any form that transitions between shapes
- Sweep follows a path curve to generate surfaces, wrapping a profile around a curved rail for tubing or organic edges
- Curve Network gives you control over complex intersecting curves, letting you build intricate organic surfaces that traditional extrusion can't handle
Surface refinement adds fillets between primary surfaces using tools that build controlled blends. Analyze curvature quality through G2 continuity standards or higher, ensuring the model meets manufacturing specifications.
Step 4: Export for Manufacturing
Format selection determines whether your design intent survives translation to manufacturing.
- STEP preserves parametric data essential for CNC machining, injection molding tooling, and multi-vendor collaboration. It maintains ISO standard specifications as a neutral format ideal for sharing between different CAD programs.
- STL provides tessellated geometry for 3D printing and rapid prototyping.
For CNC machining, export STEP with the highest precision settings and verify units before sending to manufacturing partners.
Method 2: AI Tools for Rapid Exploration
AI tools turn sketches into 3D models in seconds. They work best for rapid concept exploration when you need to evaluate design directions before committing to production modeling.
When to use: AI sketch-to-3D tools excel in specific scenarios.
- Rapid concept exploration when you need to evaluate 15-30 design directions in hours rather than days
- 3D printing conceptual prototypes after manual topology cleanup
- Reference models for informing manual parametric CAD work
- Early ideation before manufacturing requirements become critical constraints
Approximately 1 in 10 AI-generated models are client-ready without rework. For hero assets requiring high visual quality or manufacturing-ready models for production tooling, you'll still need Method 1.
How AI Sketch-to-3D Works
AI sketch-to-3D platforms like Vizcom Render generate models from single images or text prompts. They export in formats like OBJ, FBX, STL, and GLB, which are all mesh formats without the parametric design history that professional CAD requires.
[Embed: https://framerusercontent.com/images/92pMGiGufqwcf9v4DzvxSIc8VE.mp4]
When you import an AI-generated mesh into CAD software with integrated CAM or parametric CAD tools, it arrives as reference geometry, not editable features. You'll need to manually rebuild the geometry using parametric tools for production-ready models.
Every AI tool shares the same basic limitation. They generate static polygon meshes, not parametric, feature-based CAD models.
Method 3: Hybrid Workflow (Recommended)
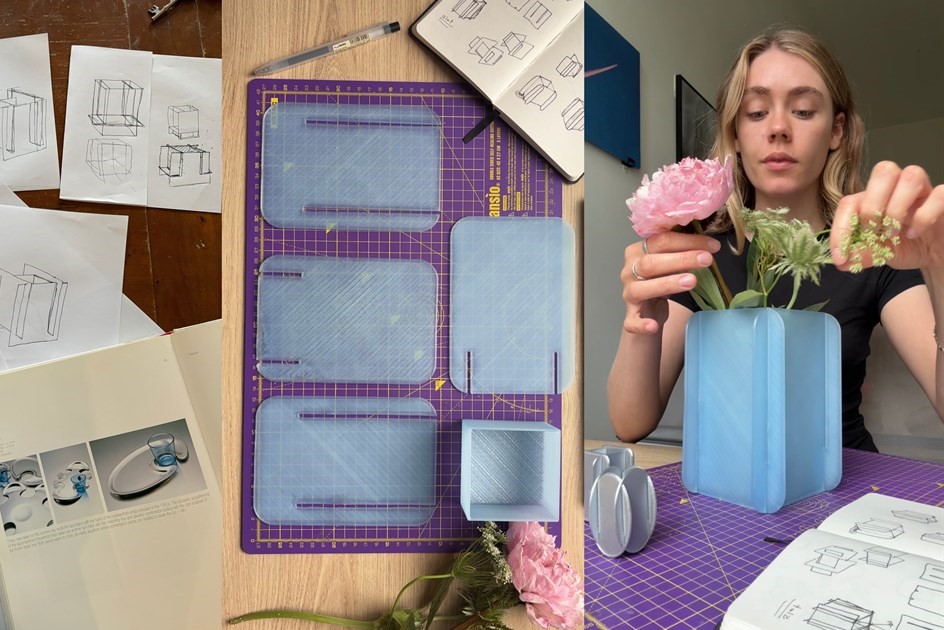
Most professionals combine AI generation with manual CAD refinement. AI tools explore organic, sculptural forms that would require extensive time to model manually. Parametric CAD handles geometric and mechanical components requiring precise dimensional control.
When to use: Hybrid workflows work best when you need both exploration speed and production-ready output. One industrial designer working on cycling helmets uses this approach. Organic helmet forms get explored through AI-assisted iteration, while mechanical components get modeled in engineering-focused CAD platforms.
Stage 1: Generate Concepts with AI
Use AI to explore broadly before committing CAD time.
Make 3D generates textured meshes from your sketches in seconds, letting you evaluate 15 to 20 form variations in an afternoon. You see concepts in 3D before investing days in parametric modeling, which means you're choosing directions based on what you can actually evaluate rather than guessing from flat sketches.
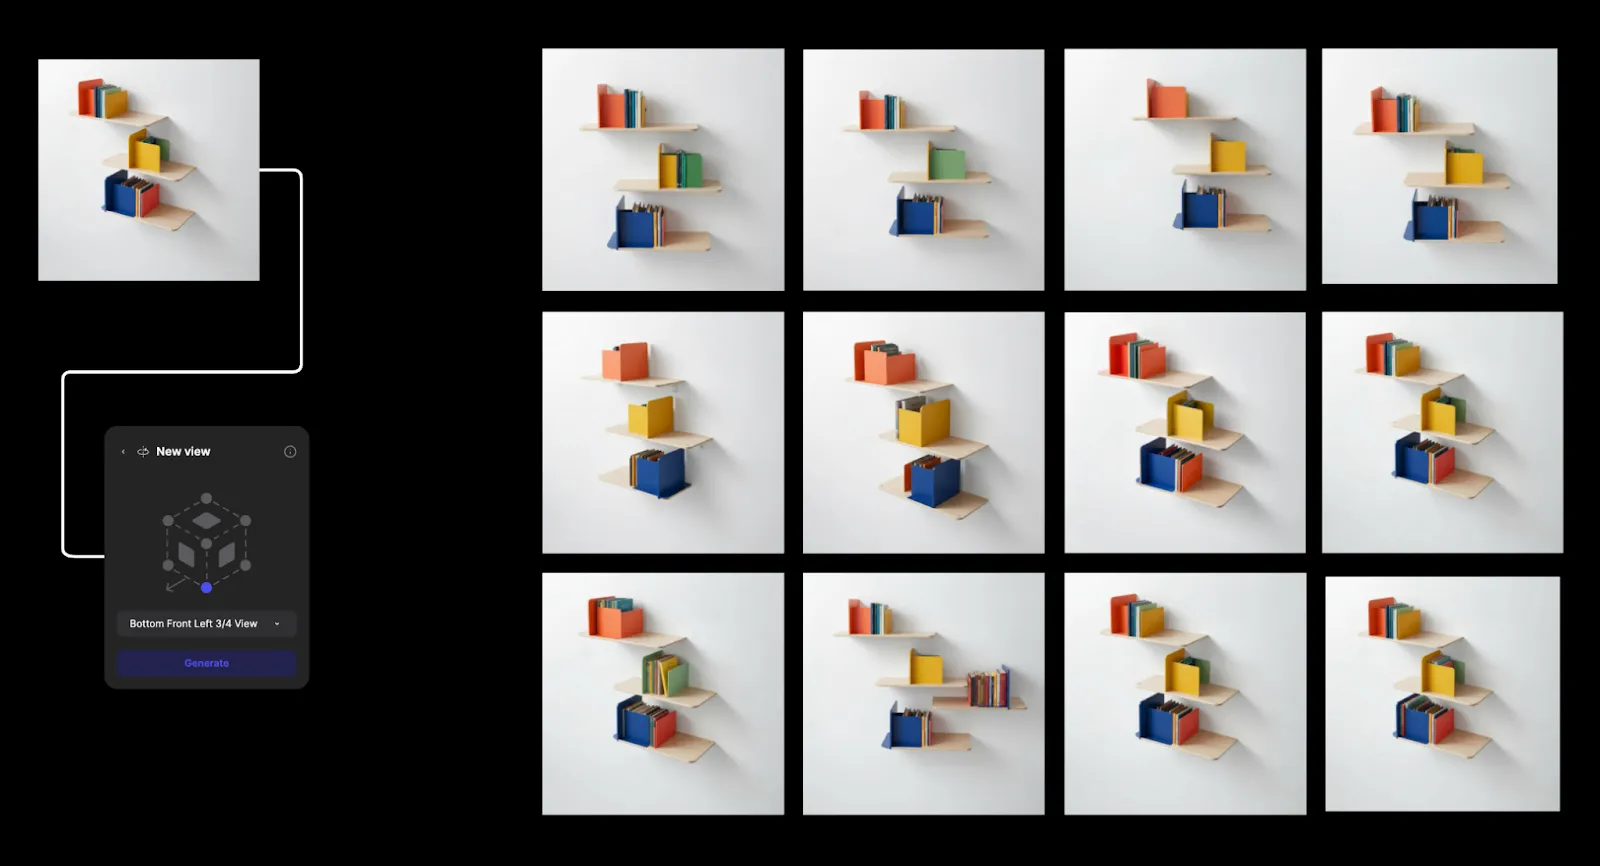
Traditional rendering takes four to eight hours per concept, forcing teams to develop only a handful of directions. Render lets you progress from sketch to photorealistic visualization in seconds, so you can explore more variations before deciding which ones warrant production CAD work.
Stage 2: Select and Rebuild in Parametric CAD
Once you've identified the two to three strongest directions, rebuild them in parametric CAD with full design intent, manufacturing constraints, and engineering requirements.
This stage follows the same process as the first method. The difference is confidence. You're not guessing which sketch has potential. You've already seen the concepts in 3D and validated the direction before investing modeling time.
Which Method Fits Your Project?
Match your modeling approach to manufacturing requirements and the project phase.
Start with Exploration, Then Build for Production
Your sketch becomes a 3D model through whichever workflow delivers the quality, speed, and manufacturing-ready control your specific project needs. Most professional projects benefit from exploring broadly with AI tools in early ideation, then shifting to manual parametric CAD for production-ready depth.
The hybrid approach removes the guesswork. You're not committing CAD time to directions you haven't evaluated. You see concepts in 3D first, validate with stakeholders, then invest in production modeling for the directions that actually work.
Try Vizcom and see how rapid 3D concept generation accelerates your early design exploration before committing to parametric CAD.
Explore
Explore more blog posts & resources to get inspired

How Jaren Dorman validated a Puma concept before committing to any of it.
Designer Tara Harcombe took her idea all the way from the first pencil lines to the finished piece, with Vizcom in the loop the whole way.


Frequently asked questions
Yes of course! Our starter plan is completely free, no credit card required. This is a great plan to explore vizcom with.
We accept all major credit and debit cards.
Admins (paid) – can edit files, manage workspace settings, billing, teams, and invite members. Editors (paid) – can edit files but not manage settings, billing, or teams. Viewers (free) – can only view files in read-only mode.
Team billing is handled centrally by the Admin. All paid seats, whether Admins or Editors, are included in a single invoice under the same billing cycle, while Viewers remain free and do not affect the cost.
Yes, you can. An Admin can update the plan in the billing settings, and the switch will take effect on the next billing cycle at the annual rate.
Yes, you own everything you create in Vizcom. For free users, while Vizcom may use generated images to improve its services, it does not claim ownership of your designs, concepts, or original ideas—you keep full rights to them. For paid users, your images and designs remain entirely private and are only used to deliver the service. Every design, concept, and image you create or upload is fully yours and kept confidential.
Vizcom does not use your data to train AI models if you’re on a paid plan. Everything you create stays private and is only used to provide the service. Free users may have their generated images included to help improve Vizcom’s services, but even then, Vizcom does not claim ownership of your designs, concepts, or original ideas—you retain full rights.